This post may contain affiliate links. We may receive a small commission, at no cost to you, if you make a purchase.
Read Disclosure
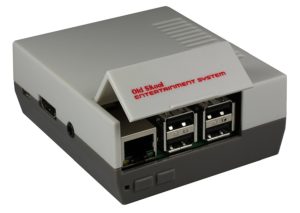
Build your own Classic NES with Raspberry Pi
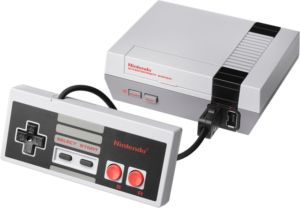 The NES Classic Edition was a miniature replica of the original Nintendo Entertainment System (NES) video game console. It came with a library of 30 built-in games and software used to emulate the original console. The emulator ran on an Allwinner R16, which is a quad-core ARM Cortex-A7 based processor.
Here’s is guide to build your own Classic NES with Raspberry Pi
What you will need:
At a minimum you will need a Raspberry Pi and USB control. Culaquier Raspberry PI use, including a Raspberry PI Zero W, however, to get the best results you should use either a Raspberry PI 2 or a Raspberry PI 3.

USB game controller is similar to a controller; You will also need a microSD card and a PC (with Windows, MacOS or Linux) to write the image of the RetroPie operating system
Raspberry Pi is capable of running several different operating systems however the default OS is called Raspbian, a specialized Linux distribution for Pi. While it is possible to configure NES emulation under Raspbian, an easier-to-use approach is to use a dedicated retro emulation distribution such as RetroPie. Based on projects like EmulationStation and Retro Arch, you can use RetroPie without a keyboard or mouse instead of relying on your game controller.
PARTS:
Classic USB Super Nintendo Controller http://amzn.to/2svr4xj
Raspberry Pi 3 http://amzn.to/2tf62zP
NES case for Raspberry Pi 3,2 http://amzn.to/2shcb1k
Kingston 16 GB Class 4 MicroSDHC http://amzn.to/2sm4ck8
Extra Parts:
HDMI a VGA, Moread Gold-Plated 1080P HDMI a adaptador VGA http://amzn.to/2smk6eC
Tendak 1080P HDMI to AV 3RCA CVBs Video Converter Composite Audio Adapter http://amzn.to/2sVPuxv
SOFTWARE:
To install Retropie it is necessary to download the image file from the download page and write it to the microSD card. Note that there are two downloads, one for the Raspberry Pi Zero and original Raspberry Pi and another for the Raspberry Pi 2 and 3. To write the image to the microSD card then use Etcher.io. There are Etcher versions for Windows, OS X and Linux.
 Once the image has been written to the microSD you can, insert it into your Raspberry Pi, make sure you have your game controller connected, and turned it on.
After the system has booted up, you will need to configure your driver. This step is very simple simply press the button of the controller that corresponds to the menu item. If the driver does not have the requested button, press any button on the controller to leave it undefined and go to the next button.
Now your clone of NES Classic Edition is up and running, but unfortunately you do not have any games. If you are in possession of a .nms ROM file, then the easiest way to use them is to copy them to a USB flash drive with FAT32 format.
On the flash drive create a folder called retropie and within that folder create another folder called roms. Finally, in the roms folder, create a folder called nes. Copy all your NES games into the nes folder.
Config.txt Video Settings
# uncomment if you get no picture on HDMI for a default “safe” mode
hdmi_safe=1
# uncomment this if your display has a black border of unused pixels visible
# and your display can output without overscan
#disable_overscan=1
# uncomment the following to adjust overscan. Use positive numbers if console
# goes off screen, and negative if there is too much border
#overscan_left=16
#overscan_right=16
#overscan_top=16
#overscan_bottom=16
# uncomment to force a console size. By default it will be display’s size minus
# overscan.
#framebuffer_width=1024
#framebuffer_height=768
# uncomment if hdmi display is not detected and composite is being output
hdmi_force_hotplug=1
# uncomment to force a specific HDMI mode (this will force VGA)
hdmi_group=16
hdmi_mode=2
# uncomment to force a HDMI mode rather than DVI. This can make audio work in
# DMT (computer monitor) modes
hdmi_drive=2
# uncomment to increase signal to HDMI, if you have interference, blanking, or
# no display
#config_hdmi_boost=4
# uncomment for composite PAL
#sdtv_mode=2
#uncomment to overclock the arm. 700 MHz is the default.
#arm_freq=800
# for more options see http://elinux.org/RPi_config.txt
gpu_mem=256